We use cookies to ensure you get the best experience on our website. By continuing to use our site,
you accept our use of cookies, privacy
policy
and terms of service
.
Auttom empowers you with a multitude of ways to interact with our
platform, ensuring flexibility and convenience. Whether you prefer
the intuitive web
interface or seek
mobile friendly operations via
our Apple
App
Store & Google
Play
Store applications we've got you covered.
Our user-friendly web application
empowers you to effortlessly
maintain and manage your fleet of vehicles, grant team members
access with customized roles, and much more. All you need to do
is sign up/log in using your credentials or gmail account, and
you're just moments away from setting up your company, vehicles,
drivers and related configurations. It's the quickest, most
hassle-free way to superdrive your fleet processes with Auttom.
Our powerful mobile Auttom applications for both Apple
Ios and Android
operating
systems helps you easily maintain & manage a
single vehicle or an entire fleet operations. All you need to do
is sign up/log in using your credentials or gmail / apple id
account, and you're just moments away from setting up your
vehicles and units configurations.
Create an account
Auttom is a comprehensive platform tailored for vehicle maintenance,
fleet management, drivers management, vehicle groups, process
automation, and efficient transportation operations. Whether you're
in the automotive industry, operate a fleet of vehicles, or need to
streamline maintenance processes, Auttom provides a centralized
solution.
Automate vehicle maintenance schedules, manage fleet subscriptions,
and access analytic reports to optimize your transportation
operations effectively.
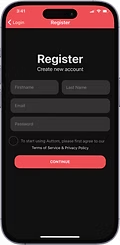
Provide your email, create a password, and submit.
Register Your Vehicle Details:
Vehicle configurations
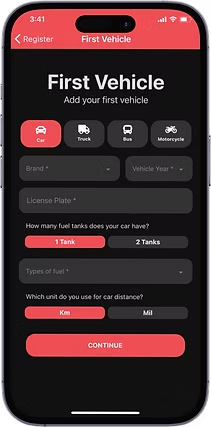
After login, you'll be prompted to set up your vehicle
details.
Enter the following information:
Vehicle Type (Car, Truck, Bus, Motorcycle)
License Plate Number
Make/Brand of the Vehicle
Model of the Vehicle
Year of Manufacture
Fuel Type (Petrol, Diesel, Electric, Hybrid,
etc.)
Tank Capacity
If your vehicle has multiple tanks, specify the
fuel type and capacity for each tank
Unit distance - Choose your preferred unit for
distance measurement (e.g., Kilometers or Miles)
Review the entered details.
Click Continue to save your vehicle
information.
Choose the Plan that best suits you.
Our plans
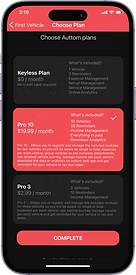
Congratulations on successfully registering your vehicle! To
optimize your experience, choose a plan that aligns with your
needs. Select from our Free or
Pro Paid plans to unlock
additional features and benefits tailored to enhance your
automotive management.
Free Plan Key Features:
Manage up to one vehicle
Alerts & Reminders are limited
Basic management module
NO CREDIT CARD REQUIRED FOR FREE PLAN
No charge. This plan is free of charge, providing essential
features for vehicle management.
Click "Complete" after choosing your plan and you will be
redirected to the home-screen.
Verify your email account and vehicle:
Mobile app
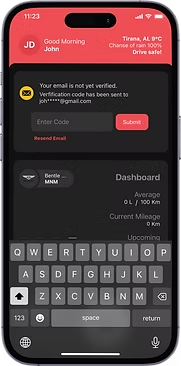
Once you've registered the account and vehicle, follow
these steps to verify the email account you used to
register.
Check Your Email
Open your email inbox and look for a message
from Auttom. This email will contain the
verification code.
Within the email, you should find a section that
includes the verification code (typically a
series of letters and/or numbers).
Copy the code
Copy the verification code from the email or
manually enter the code to the Verifications
Screen/Dialogue.
Submit and Verify
Once you have entered the code, look for a
button or option labeled
Submit. Click on this
button to complete the verification process.
Confirmation
After submitting the code, you should receive a
confirmation message indicating that your account
has been successfully verified. This may also
include additional instructions or information
regarding your verified status.
With your account now verified, you should be able
to log in and access the full features of the
platform or service.
Remember to keep the verification code confidential
and do not share it with others. If you encounter
any issues or do not receive the verification email,
check your spam or junk folder, or contact our
support for assistance.
Congratulations! Your account is now verified and
ready for use. If you have any further questions or concerns, refer
to the platform's support resources for assistance.
Now, you're ready to explore the app's features for efficient vehicle
maintenance, reminders, and more. Feel free to navigate through the
dashboard, explore service history, and utilize Auttom's
functionalities for an optimal vehicle management experience.
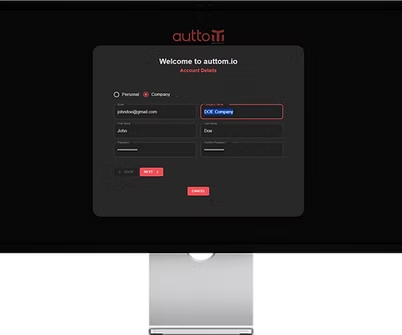
Provide your email, name, surname, company, create a
password, and click "next".
Register Your Vehicle Details:
After login, you'll be prompted to set up your vehicle
details.
Enter the following information:
Vehicle Type (Car, Truck, Bus, Motorcycle)
License Plate Number
Make/Brand of the Vehicle
Model of the Vehicle
Year of Manufacture
Fuel Type (Petrol, Diesel, Electric, Hybrid,
etc.)
Tank Capacity
If your vehicle has multiple tanks, specify the
fuel type and capacity for each tank
Unit distance - Choose your preferred unit for
distance measurement (e.g., Kilometers or Miles)
Review the entered details.
Click Continue to save your vehicle
information.
Verify your email account and vehicle:
Once you've registered the account and vehicle, follow
these steps to verify the email account you used to
register.
Check Your Email
Open your email inbox and look for a message
from Auttom. This email will contain the
verification code.
Within the email, you should find a section that
includes the verification code (typically a
series of letters and/or numbers).
Copy the code
Copy the verification code from the email or
manually enter the code to the Verifications
Screen/Dialogue.
Submit and Verify
Once you have entered the code, look for a
button or option labeled
Submit. Click on this
button to complete the verification process.
Configure your account
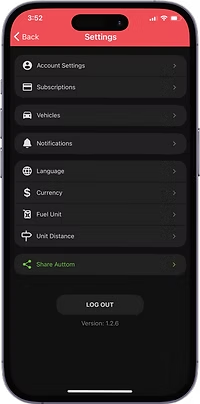
Auttom provides a user-friendly experience to configure your vehicle
metrics and personalize settings according to your preferences.
Follow these steps to set up your account settings and vehicle
metrics in the Auttom app:
Open the Auttom App - Launch the Auttom
application on your mobile device.
Navigate to Account Settings - Tap on your
profile icon, located in the top left corner.
Save changes - Confirm your selections to save
changes, and you are now ready to drive with Auttom!
Dashboard
Settings
Terminology
Analytics
Our analytics module provide detailed insights and reports on your
vehicle:
Odometer - Track actual mileage, mileage per
event, and get monthly mileage reports for a clear view of
vehicle usage
Services - Analyze service expenses over
various periods to keep maintenance costs under control.
Refueling - Monitor refueling expenses and
consumption over time. Get an average fuel efficiency report
based on mileage to optimise fuel management.
Expenses - Stay on top of all vehicle-related
costs with detailed expense tracking, helping you manage your
budget effectively.
Income - Analyse revenue generated by each
vehicle, ensuring you're maximising profitability across your
fleet.
Dashboard
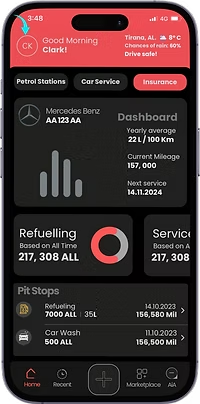
Just like in a car, our dashboard is your insights center, offering
essential instruments and controls for your vehicle:
Make & Plate - Identifies the vehicle for which
the records are displayed. Clicking vehicle brand icon allows
you to easily switch between different vehicles.
Avg. Fuel Consumption - Calculates the average
fuel consumption based on refuelling and kilometres logged. For
an accurate result, make sure to log every full fuel.
Last Odometer - the last logged total mileage
of the vehicle.
Upcoming Event - Displays reminders and alerts
based on your vehicle’s records, such as service due dates or
insurance renewals etc.
The Graph - Visualizes the total monthly
expenses logged for the last four months. Click on each bar to
see detailed figures
PnL - Profit and Loss provides a clear report
of income versus expenses for the current month, especially
useful for taxi businesses and car rental companies.
Pit stop
We chose the term PitStop, inspired by F1 racing, to represent a
comprehensive log of your vehicle's activities. Each PitStop entry
provides a detailed view of:
Odometer Score - the mileage score at the time
of each event. Log a Vehicle Service with at 50,000 Km.
Event Log Timestamp - Log the exact date and
time of each event and it will be displayed accordingly. Ex.
Insurance purchased at 24/07/2024
Service List and Cost - Displays all services
performed, along with their respective prices, date and details.
Ex. Vehicle service - Oil and filter - €150 at 24/07/2024
Odometer 55,000 KM. Next Service date at 70,000 km
Refueling Details - Includes fuel type, total
liters, price per liter, total amount spent, date/time and any
additional notes.
Expense Type and Cost - List any expenses you
incurred for your vehicle such as car wash, parking, taxes, etc.
with the related amount, date/time and mileage score
Reminder/Alerts - Provides reminder
notifications option, with notification date/time, and any
recurring schedule based on time (month/year) or mileage. For
example notice for the payment of annual taxes. You will be
reminded via email and Push notification on the devices you are
logged in.
Income Type and Amount - detailed listing of
all the income you have received such as car rent, taxi service,
etc. categorised by type and event details such as amount,
date/time, kilometres etc.
Manage Orders
Create Orders
A guide to creating, scheduling, assigning, monitoring and editing
orders.
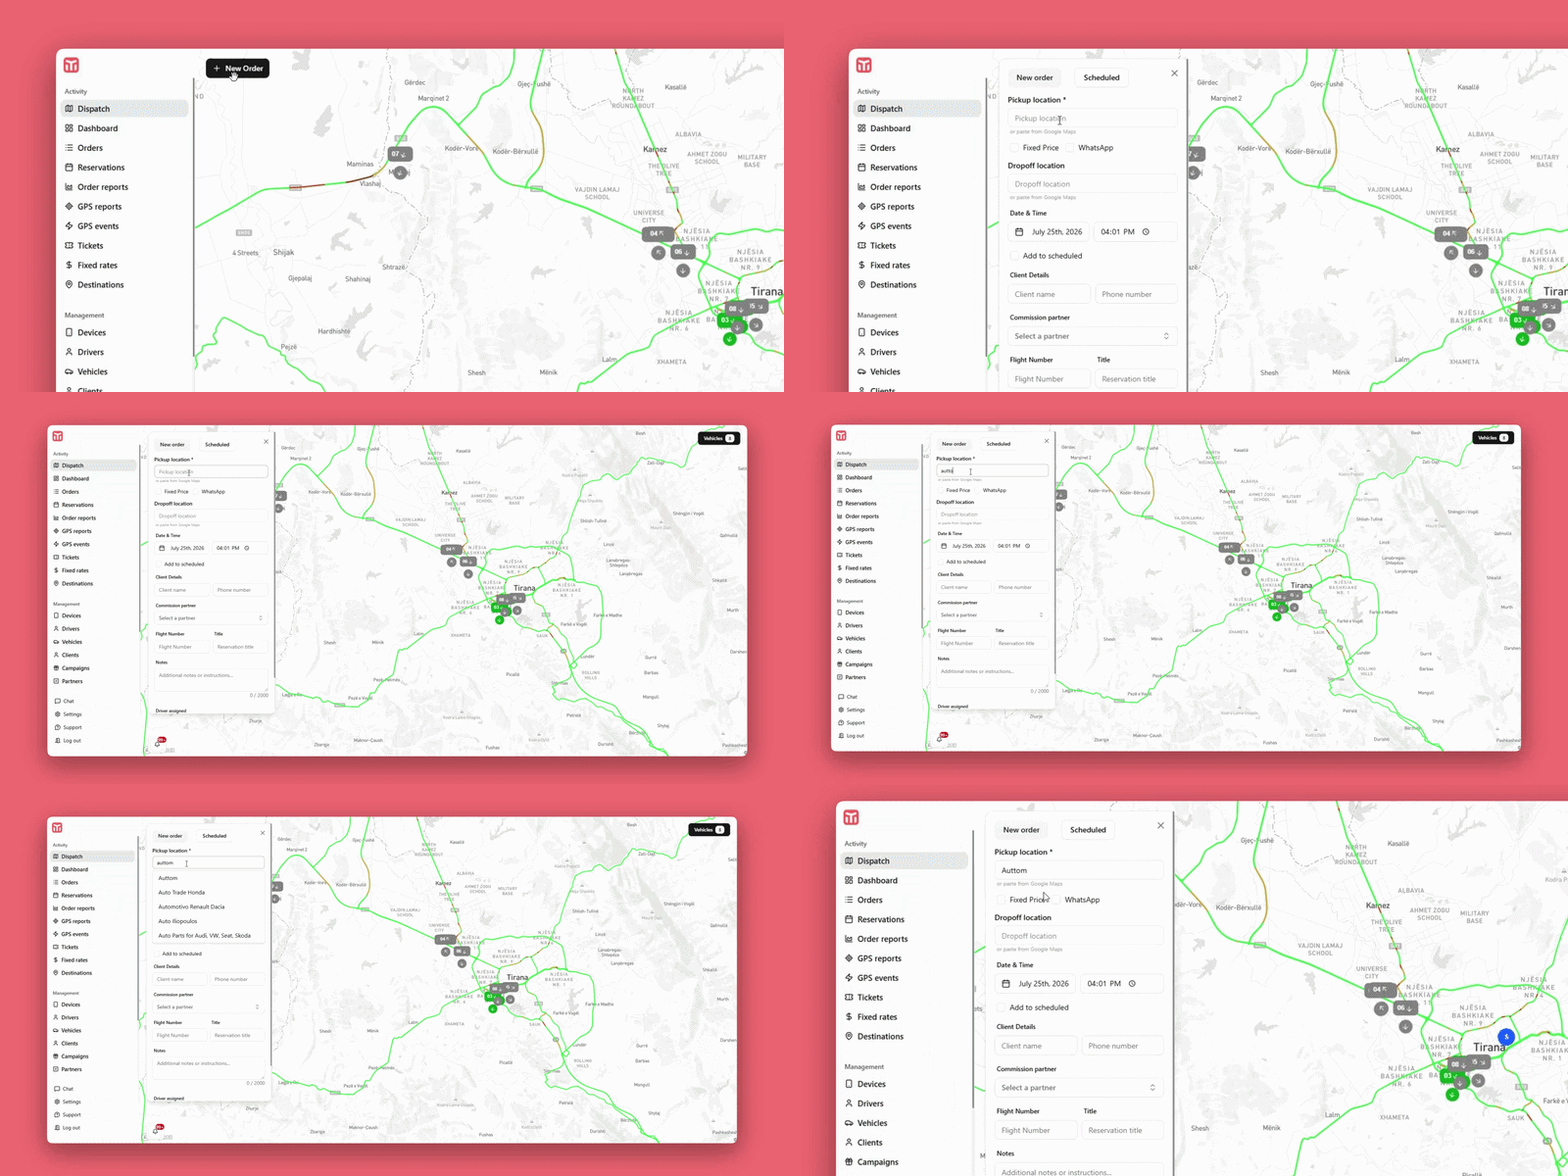
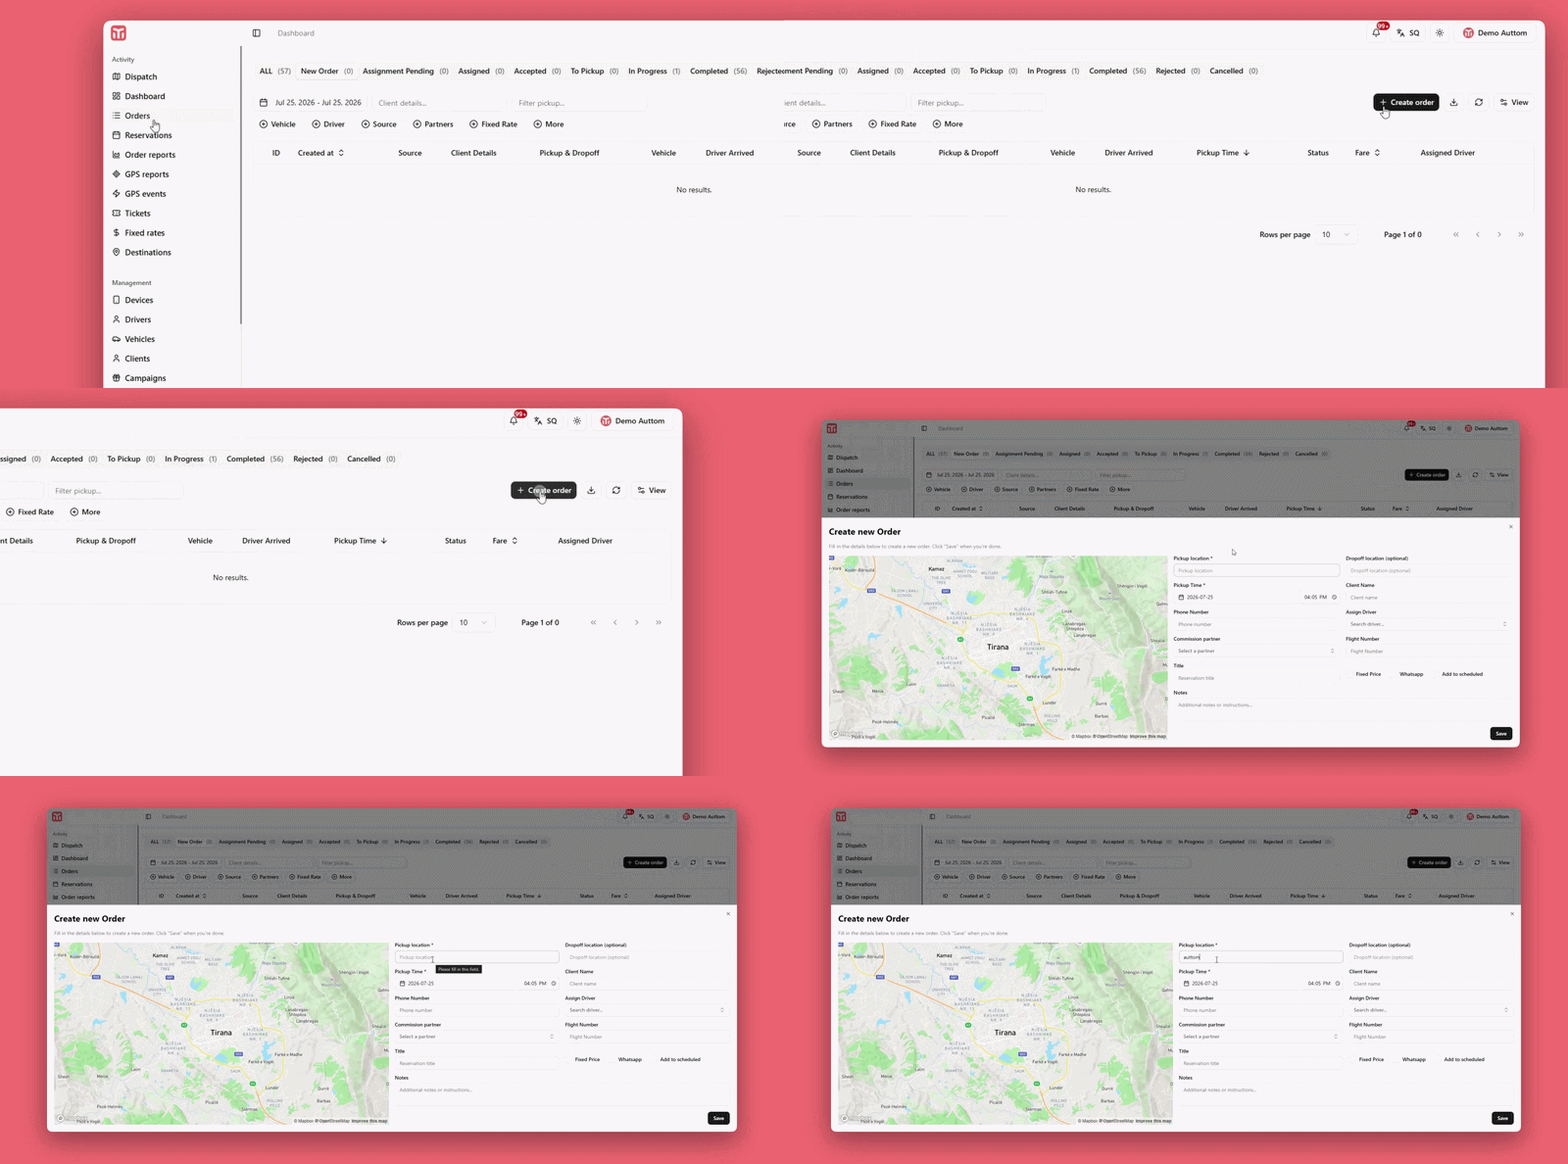
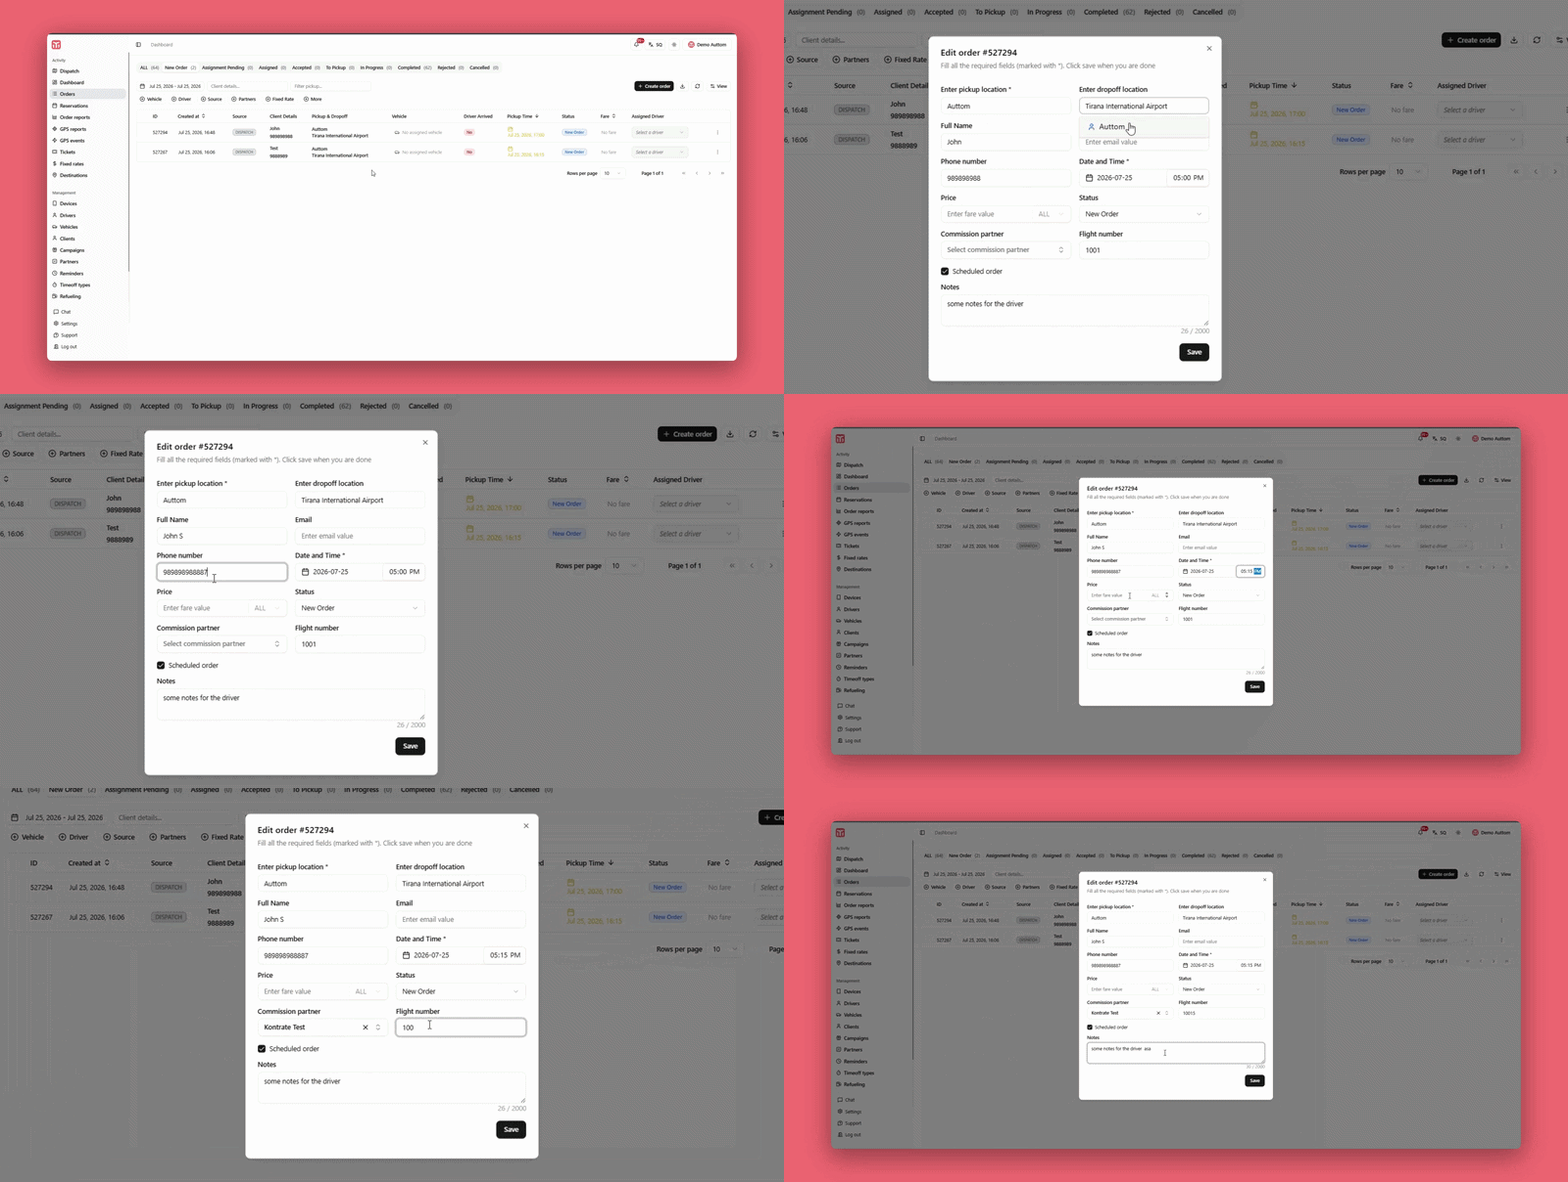
A new order can be created from two places, and both open the
same order form:
From Dispatch - Click
"New order" at the top-left of the map. This
is the fastest way to create an order while you're already
watching live vehicles on the map, and it's ideal when you
want to assign a driver manually right away based on their
position.
From the Orders menu - Go to
Orders in the left sidebar and click the
"+ Create order" button at the top-right of
the orders list. This is handy when you're already reviewing
or managing existing orders and want to add a new one without
switching to the map view.
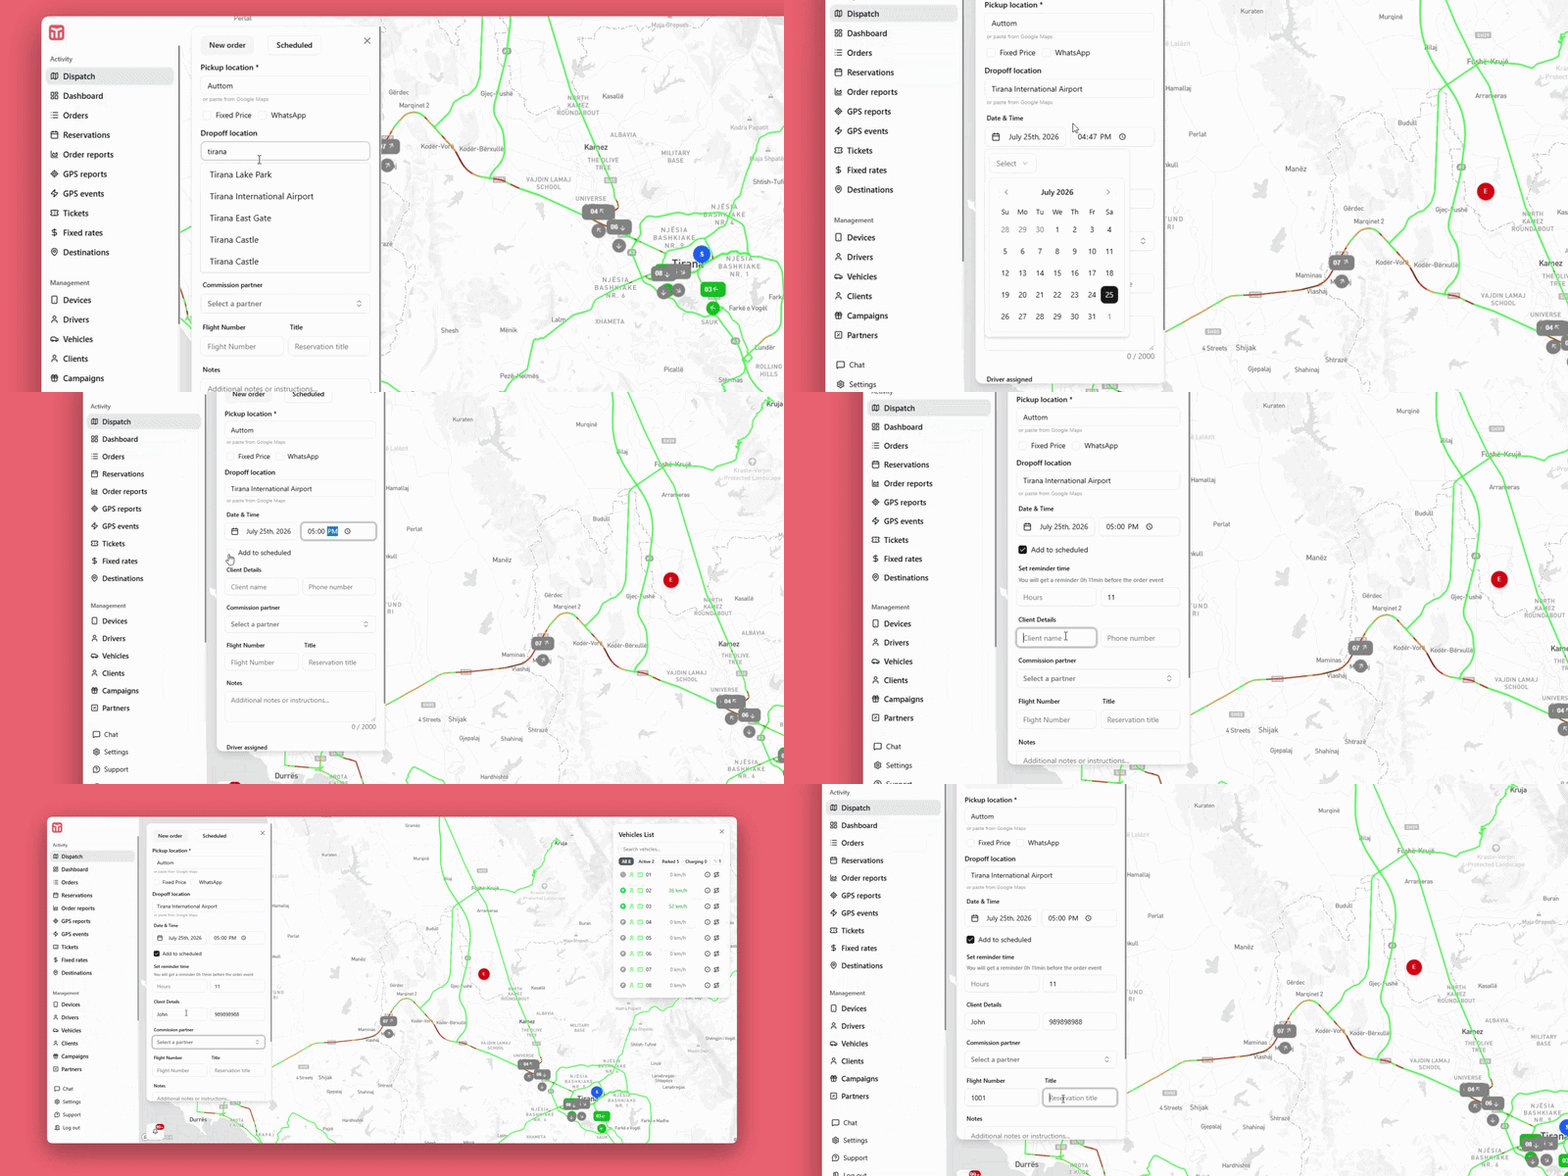
Fill in the details and click
"Save" / "+ Add Order" at the
bottom of the panel to create the order:
Pickup location* - The pickup address.
Required. Type it manually or paste it directly from Google
Maps.
Fixed Price / WhatsApp - Mark the fare as
fixed, or flag the order as originating from a WhatsApp
booking.
Dropoff location - The drop-off address.
Optional, can be left empty for open-ended trips.
Date & Time - The date and time the driver
should arrive at the pickup location.
Client Details - Client name and phone
number.
Commission partner - If the order originates
from a partner, select the relevant partner to track
commission.
Flight Number & Title - Optional flight
reference for airport transfers, plus a short reservation
title to identify the order at a glance.
Notes - Use this field to leave instructions
for the driver (e.g. meeting point, luggage, access codes) -
up to 2,000 characters.
Assign Orders
Once the required fields are filled in, you can assign the order
to a vehicle in two ways:
Manual assignment - Open the
"Vehicles" list at the top-right of the map
to see all available vehicles (shown as green
"Free" markers) and select the one you want
to dispatch to the order.
Auto-assign - If auto-assignment is enabled
in your company settings, the system automatically selects
the driver based on closest proximity or
priority rules defined in your
configuration, without requiring manual selection.
Schedule Orders &
Reminders
To plan a trip for a future date, check
"Add to scheduled" on the order form. Two
additional fields will appear:
Set reminder time - Define how long before
the pickup (e.g. hours and minutes) you want to be notified,
so you get an alert ahead of the order event.
Assignment behaviour - Depending on your
company configuration, the scheduled order can either wait
for a manual driver assignment closer to pickup time, or be
assigned automatically to the closest available driver, or
based on priority, once the scheduled time approaches.
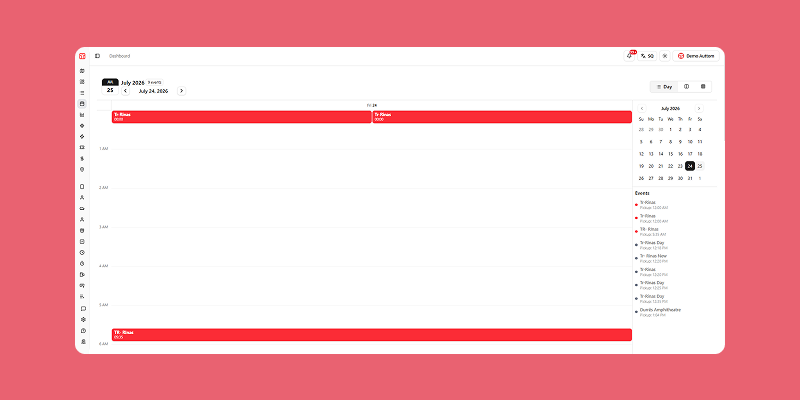
Reservations
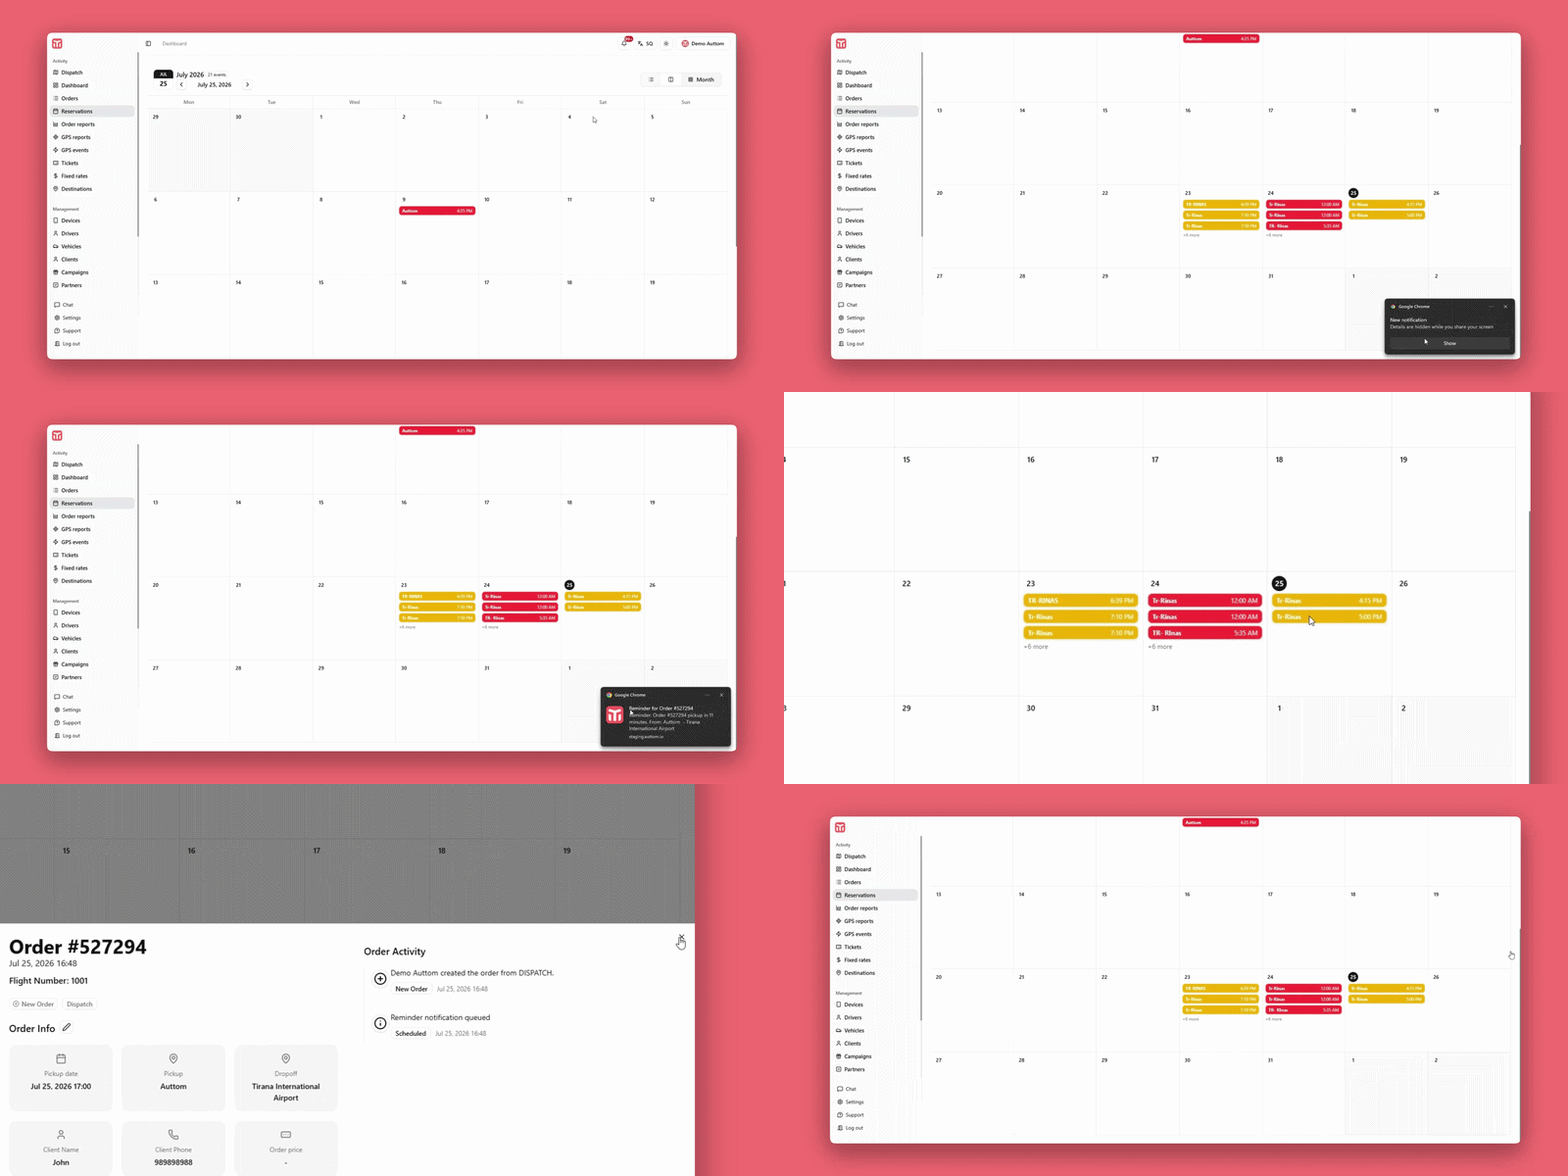
Every order created with "Add to scheduled"
checked is automatically reflected in the
Reservations menu, which gives you a calendar
overview of all upcoming trips separate from the live Dispatch
map:
Date Navigator - The panel on the left (e.g.
"JUL 25") highlights today's date and the number of events
for the currently selected month. Use the arrows next to the
month name to move between months, or click the highlighted
date to jump straight back to today.
Month Calendar Grid - The main area displays
a full month, Monday to Sunday, so you can see how
reservations are distributed across the weeks at a glance.
Event Badges - Each scheduled order appears
as a colored badge on its pickup day, showing the pickup
location/title and pickup time (e.g. "Lulishte Komuna e
Parisit - 11:00 AM"). Multiple orders on the same day stack
vertically, and badge color reflects the order's current
status (e.g. red for cancelled).
View Switcher - Use the icons at the
top-right (List, Split,
Month) to switch between a simple list of
upcoming reservations, a split calendar/list layout, or the
full month grid, depending on how you prefer to plan.
Clicking any event badge opens the same order details view
used for regular orders, so you can review, follow or edit
the reservation without leaving the calendar.
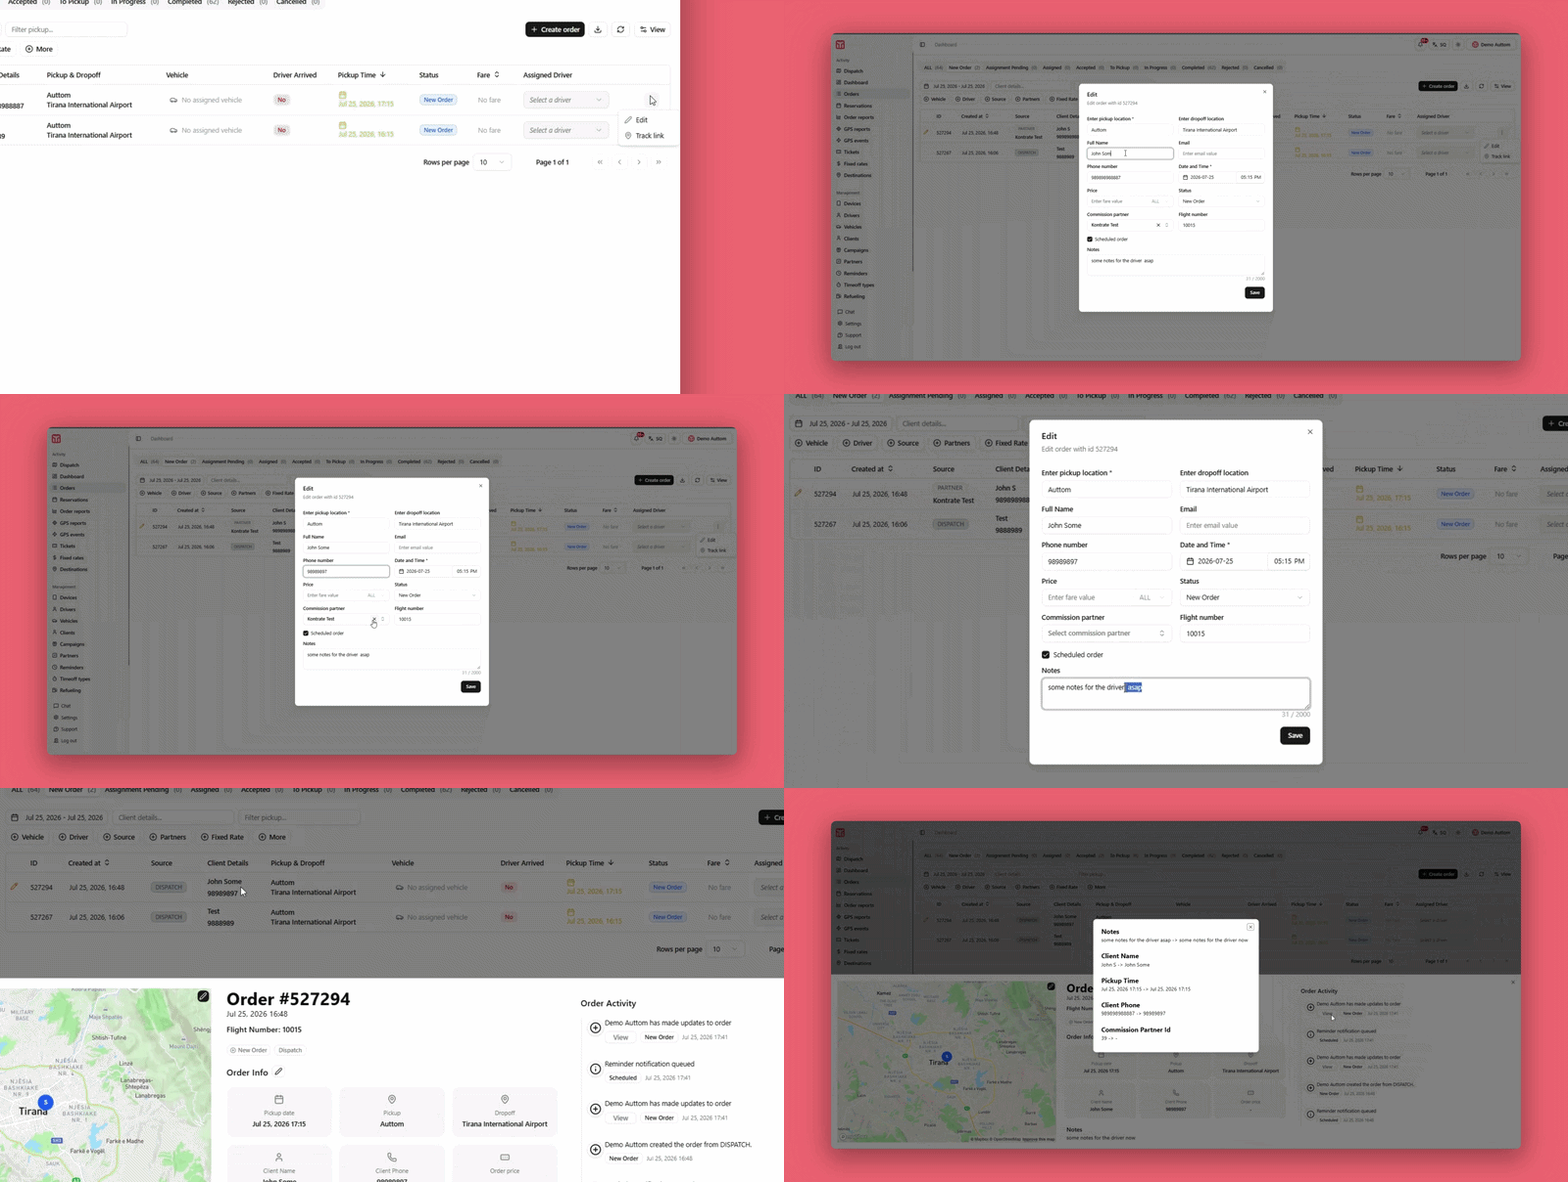
Edit Orders
Orders can be edited from two places:
From the order list - Click the three-dot
icon (⋮) at the end of the order's row and
select "Edit".
From the order details view - Click the
pencil icon next to the map (top-right corner) or next to
"Order Info" to update pickup/dropoff
locations, date & time, client details or price.
Follow Orders: Details &
Timeline
Clicking any order - from the orders list, the map, or the
Reservations calendar - opens its Order Details
view, giving you a complete, real-time picture of the trip:
Header - Shows the order ID (e.g. "Order
#801593"), its pickup date/time, and its current status
badge (e.g. New Order,
Assigned, Accepted,
To Pickup, In Progress,
Completed, Rejected or
Cancelled), plus its source (e.g.
"Dispatch").
Live Map - On the left, the pickup point
(S), dropoff point (E) and, once assigned, the driver's
live position are plotted on the map so you can visually
follow the trip.
Order Info - Summarizes the pickup date,
pickup address, dropoff address, client name, client phone
and order price at a glance; click the pencil icon here to
edit any of these fields.
Notes - Displays any instructions left for
the driver when the order was created or last edited.
Order Activity (Timeline) - On the right,
the Order Activity panel logs, in
chronological order (most recent first), every event that
has happened to the order, each with its own status tag and
exact timestamp, for example:
Admin created the order from Dispatch -
New Order
Admin assigned a driver to the order -
Assigned
Driver has accepted the order -
Accepted
Driver is going to the pickup location -
To Pickup
Order canceled, with the reason shown (e.g.
"Duplicate") - Cancelled
Admin has made updates to the order, with a
"View" link so you can see exactly
what was changed and when
This timeline gives you a complete, auditable history of the
order - who did what and when - from creation all the way
through to its final outcome, whether that's a successful
completion or a cancellation.
Notifications - Everyone involved in the
order (admin, dispatcher, assigned driver and, where
configured, the client) is automatically notified by the
system whenever a reminder is triggered or the order's status
changes - for example when it's assigned, accepted, the
driver is on the way, or the order is completed or
cancelled - so everyone stays up to date in real time without
needing to refresh or check manually.